Surgical margins of tumor biopsies are evaluated on every routine section in our laboratory. However, on routine samples the evaluation is limited to the extent of the neoplasm in two cross sections. A more complete margin evaluation is a complex process and has to be specifically requested for each biopsy submission. The cost for surgical margin evaluation varies depending on the size of the submitted specimen, not the mass. Size is measured as the longest dimension (diameter) of the excised specimen. Margin evaluation fees are charged in addition to the standard biopsy fee.
Margin evaluation helps the veterinary surgeon determine whether a neoplasm was removed in its entirety and, in cases of “dirty” margins, provides information about where the neoplasm extends beyond the surgical margin. The final report includes access to digital photographs of the submitted specimen that indicate where sections were trimmed for margin evaluation. Commercial laboratories do not commonly perform margin evaluation due to the labor intensity and low income generated. Margin studies require additional processing steps, including inking the lateral and deep tissue margins and diagramming the subgross specimen site selection.
In human medicine, neoplasms are sectioned like a “bread loaf” or a “pie” to have the most detailed information for each submission. This procedure is time and cost intensive, especially for large tumor samples. To avoid unnecessary costs for our clients and to provide detailed information on the extent of a neoplasm in a submitted section, we have devised a specific protocol explained here.
For certain types of masses, such as mammary tumors, feline adenocarcinomas, or mast cell tumors in dogs or cats, tangential sections are by far the most preferred method to evaluate margins. The advantage of the tangential sections, or orange peel, is that you cover the complete deep and lateral surface of the mass. The pathologist can then tell you where the tumor extended to surgical margins.
If we only were to perform tangential sections, the problem would be that we could not tell you the distance of the tumor to the margins because these are tangential sections that only have a depth of 5 to 10 microns. If neoplastic cells can be found in any of these sections then that automatically means that the margin is dirty. We combine this tangential technique with half and quarter sections so that we can give you some numerical margins for the radial sections. For many tumor types, the evaluation of tangential sections is most important.
For soft tissue sarcomas, however, we actually recommend that you do not spend your money on a complete margin evaluation. In these tumors, neoplastic cells tend to follow fascial planes and send out little tentacle-like projections. These can be very thin. If we look at them as tangential sections, we will not see them and if we look at them as bread loaf sections, there is a high chance that we will miss them. A CT scan or an MRI can give a better assessment of the total size and extent of the mass, and then you can guide your surgery accordingly.
Inking and Evaluation of Surgical Margins
Figure 1: To correctly identify surgical margins during the trimming process in the histology laboratory, it is necessary to paint (ink) the surgical margins. This can be done by the submitting veterinarian on unfixed samples or in our laboratory after the samples have been fixed. The procedure is simple and does not interfere with the microscopic evaluation. Besides ink, cotton swabs and wooden applicator sticks are all that are needed. Surgical margins of a biopsy are painted with a dye that adheres to the tissue and is visible under the microscope. There are many commercial dyes available, such as the one depicted from Cancer Diagnostics, Inc. Such kits contain multiple different colors (black, blue, green, red, yellow, etc.) for different aspects of mass orientation.

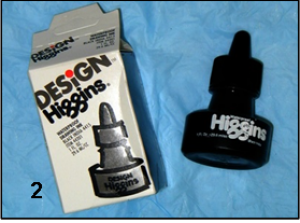
Figure 2: To save money, simple waterproof drawing ink can be purchased (Wal-Mart etc.) and such bottles will last several years.

Figure 3: The drawing ink can even be diluted with isopropyl alcohol (1:1). Isopropyl alcohol is also useful when submitting fixed tissue through the mail in winter months. The 10% neutral buffered formalin used for fixation of specimens is subject to freezing in very low temperatures. The addition of a small amount of isopropyl alcohol to the formalin specimen container (one part alcohol to 10 parts formalin) will help to prevent damage to the tissue specimen related to freezing and thawing.

Figures 4 and 5: Biopsy margins can be painted on unfixed or fixed tissues. It is often an advantage for referring veterinarians to ink the margins on an unfixed tissue because they performed the surgery and can best identify margins of concern. The mass should be placed on some absorptive material and be blotted dry prior to painting the margins.

Figure 6: Different colors may be used to mark the cutaneous surface of a mass (Figure 6a), which will help the histotechnician to correctly identify the orientation of the neoplasm. Such inking marks are superior to using sutures of different colors to identify proximal and lateral margins of a mass.

Using a cotton swab facilitates even color distribution over the deep tissue margins. The referring veterinarians may decide to ink only margins of concern where they suspect incomplete removal. We will only evaluate the inked margins.
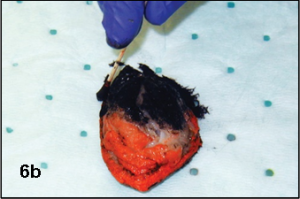
The biopsy margins of the mass may be inked with multiple colors too (Figure 6b). Do not pour dye on the surface; use the cotton swab or wooden applicator stick. A wooden applicator stick is especially helpful to ink the lateral margins by rolling it along these tissue margins. After inking the margins, the dye should dry for 5 to 10 minutes prior to immersing the sample in formalin. Some dye will dissolve within the fixative, but this will not affect the evaluation. For really large samples (thicker than 1-2 cm) incisions could be made into the mass on the cutaneous surface side to improve penetration of fixative.

Figure 7: After receiving the tissue, our technicians will palpate the section to determine where the mass/lesion comes closest to the surgical margins.

Figures 8 and 9: We will bisect the specimen vertically through the mass so the section extends through the margin closest to the identified mass and the center of the mass. A 2-6 mm full thickness plane/slab/piece will be cut from the cross section surface of the mass.

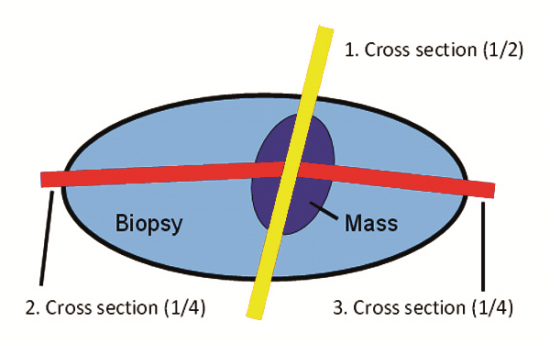
Figure 10: In our laboratory the standard trimming method used for ellipse sections is the “Cross Method” (i.e. 1/2’s and 1/4’s). The yellow line demonstrates the cross section of the mass and the associated closest specimen margin as illustrated in figures 11 and 12. The red line demonstrates the quarter sections (1/4’s) as illustrated in figures 14 and 15.

Figures 11 and 12: The inked margins are easy to recognize on the half section of the mass. Depending on the size of the mass, the half section may have to be split to fit into cassettes for further processing.

Figure 13: Following embedding in paraffin and sectioning, the half sections of the mass will be placed on slides for microscopic evaluation.

Figures 14 and 15: Halves of the mass that have resulted from the cross section are vertically cut from the mass/lesion through the longest axis of the tissue and thin sections are placed into cassettes (1/4’s). These pieces demonstrate the mass in a different plane, and the association of the mass with surrounding normal long axis tissue margins.

Figure 16: The number of slides necessary to identify whether the deep margins are clean is determined by the size of the mass as illustrated. Evaluation of deep margins will be performed only along the previously described half and quarter sections for standard biopsies. Detailed evaluation of tangential deep margins will only be performed following a written or oral request for a full margin study as additional charges apply.

Figures 17-20: For complete margin evaluations of standard skin tumors, tangential lateral and deep margins will be performed. Figure 17 shows a tangential lateral margin. The inked surface will be laid down flat in the cassette and any neoplastic cells in this section will indicate a dirty lateral margin. Figures 18-20 show lateral tangential skin sections being trimmed and placed into a cassette.

The number of slides needed to evaluate margins and the price for margin evaluation is based on the size of the excised tissue. Generally, specimens smaller than 2 cm long will require two additional slides; specimens 2-4 cm long will require six additional slides; specimens 4-6 cm long will require nine additional slides; and specimens 6-8 cm long will require 11 additional slides. Prices can be found in our catalog of available tests or on the fee schedule on our website.

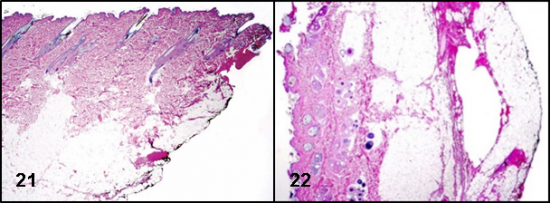
Figures 21 and 22: Inked tissue section margins (lateral margins: figure 21; deep margins: figure 22) are easily recognized on microscopic examination and will help the pathologist to determine complete surgical removal.

Figure 23: For complete margin evaluations, an annotated image, such as the one in figure 23, can be accessed through the client’s account in WebView on our website. The pathology report will include which margins are clean and which margins are dirty so that clinicians will know where they will need to focus for additional surgical excision or radiation therapy. The sections indicated in yellow represent the radial cross sections. The sections outlined in red indicate the tangential lateral margins and the sections outlined in black indicate the tangential deep margins.

Margin Evaluation for Special Tissues
For masses in lobar tissues, like a lung lobe or liver lobe, we examine representative sections of the mass and we also take sections through the surgical margin into the mass. Then we assess tangential sections of the surgical margin, or point of attachment where that particular lobe was excised. There is no additional fee for margin evaluation of lobar masses.
Sections of spleen can be extremely complicated. We often have to distinguish hemangiosarcoma from follicular hyperplasia or hematoma. We cut a minimum of five representative sections of each splenic specimen because we want to increase the likelihood of getting an accurate diagnosis and not miss a hemangiosarcoma. If we cannot reach a diagnosis from these five sections, we often go back and trim even more tissue. Areas of intact viable neoplastic cells can be very focal in hemangiosarcoma cases; therefore, it is best to submit the entire spleen for evaluation. If this is not possible, multiple splenic sections should be submitted that include areas from the center of the mass and, more importantly, multiple sections taken through the borders of the mass that contain adjacent grossly normal splenic tissue.
Toes are very special tissue as well. When we get a toe with a mass on it, first we trim a representative section through the soft tissue portion of the mass. This way we can begin processing to reach a diagnosis quickly and ensure that we have a non-decalcified section of the mass in the event that IHC is needed for determining diagnosis or prognosis. We start out with a soft tissue sample of the mass and then some soft tissue from the proximal margin. Then we place the toe in decalcification solution. After decalcification we take sections through the bone. We take a cross section as a proximal margin and sagittal sections from the nailbed through the phalanges to include the tumor.
In the figure below we have an example of a tumor on a digit. Our first section would be a representative section indicated by the red line labeled A1. Then we take additional sections: A5 for the proximal margin; A3 and A6 for tangential sections through the whole length of the bony specimen to the nailbed.

There is an additional fee for processing toes. Please see pricing in our catalog of available tests or on the fee schedule on our website.
Bone is a special tissue as well. Bone is one of the few tissues where you do not want to sample the margin between normal and abnormal tissue when examining a lytic lesion. Instead, you want to biopsy the center of the lesion (green section indicated on radiograph). Bone is a very dynamic tissue. If you go to the margins there will be a lot of hyperostotic compensation for the lytic lesion (red section indicated on radiograph). A very high percentage of the bone biopsies that we receive are non-diagnostic because they are not deep enough. Many just contain periosteal reactive bone and some only contain the surrounding connective tissue and periosteal fibrosis.

We also have a diamond saw which can cut formalin-fixed tissue composed of bone and soft tissue. This allows for faster and more standardized processing of bone biopsies.
There is an additional decalcification fee to process bony tissues and an amputated limb fee for submission of entire limbs. Please see pricing in our catalog of available tests or on the fee schedule on our website.
For intestinal samples, we always do an oral and an aboral cut to assess the margins of the excised portion of the intestine, and then we cut quarter and half sections through the intestinal mass. There is no additional fee for margin evaluation of intestinal specimens.
For eyes, begin fixation as soon as possible after enucleation/death to minimize autolysis. Remove extra ocular tissue, as this helps with fixation and trimming. For the eye, you want to have an even higher concentration of fixative, so 1 part globe to 20 parts fixative.
Allow plenty of space around globes, so they are not compressed when placed into the container. In many cases, it may be advantageous to put some gauze underneath the lid of the container so the eyeball is pushed deeper into the solution when the lid is shut. Eyeballs tend to float and the upper portion of the eyeball isn’t properly fixed if the solution doesn’t reach the lid. It is unnecessary to use systemic perfusion for fixation (piercing the globe with a needle and filling it with formalin); you are much better off just placing the eye, as is, into the formalin. You also do not want to incise the globe for better fixation. The end result will look like a completely scrambled globe. You want to keep the left and the right globe separate and identify them properly.
In most cases, formalin will do a decent enough job to fix the eye and most labs can process these samples. Not every lab will get the same quality result with every fixative.
For really small eyes, there are special cuvettes that you can use for submission. You can put the eyes in these and identify the left and right orbs. This is really advantageous if you deal with small animals.
When sectioning, we want to achieve a section that has a perfect lens with no fragmentation. A section right through the center of the eye so that you can see the optic nerve entering the globe and a nice attached retina is ideal. You can easily examine the cornea as well as the pupils.
There is an extra “Ocular Pathology” fee that is added on to the price of a standard biopsy. Please see pricing in our catalog of available tests or on the fee schedule on our website.
